This recipe has limited hands-on prep time. All you have to do is pop the ingredients in the slow cooker and let it go all day. Leftovers can be portioned and frozen for later.
Serve this marinara over pasta or chicken parm. It can also be used as a chunkier pizza sauce.
Slow Cooker or Stove-top
You’ll save the most time on this recipe by making it in the slow cooker, however, it’s also quite simple to make on the stove. I prefer the slow cooker method because it allows the flavors to develop and is hands-off.
This sauce can be served over your favorite pasta and can be used to top your chicken parmesan. Feel free to add veggies, cooked ground meat, or meatballs to customize it. I love adding cooked Italian sausage, mushrooms, and peppers to make it hearty.
Portion and freeze the leftovers
Allow the sauce to cool before portioning and freezing it. I like to store it in medium-sized Ziploc bags, and frozen flat so the store and stack nicely in the freezer. One cup portions would be great if using for a dish like chicken parmesan, and 2-3 cup portions are better for using it as a pasta sauce if you’re adding veggies or meat. In the end, choose portion amounts based on how you intend to use the sauce in the future.
Allow sauce to cool before portioning and freezing.
Recipe Notes
This recipe can be made on the stove-top. Sauté onions and garlic in a bit of olive oil, add remaining ingredients and simmer on low for 20-30 minutes. It can also be pureed with an immersion blender for a smoother sauce.
Pesto is an excellent condiment to use to amp up any dish. Warm it up as a sauce on a pizza, pasta, eggs or serve it up at room temperature as a spread for sandwiches or bread or drizzled on a salad or in a soup. Continue reading →
Last week, I headed to a friend’s cottage for a couple days to catch up with some friends and their kids. I was on lunch duty so I wanted to make something that everyone would be into, something healthy and something that could be made into a second meal or snack if there were leftovers.
The four of us met in the Faculty of Education, so I thought it was fitting to use this as an example of a easy back-to-school lunch. While the four of us are all using our education degrees in different capacities, we can all agree that a quick, healthy lunch works for everyone, no matter what they’re up to.
I decided on a “bowl bar” so that we could accommodate any food allergies or dietary restrictions. Each person can customize their own meal, which the occasionally still picky eater in me loves.
I’m sure you’ve heard different names for these bowls before today: Buddha bowl, Nourish bowl, Grain bowl. Any way you label it, it’s food in a bowl. I didn’t want to overdo it with the ingredients, but I wanted enough ingredients that people could pick and choose from.
Bowl basics
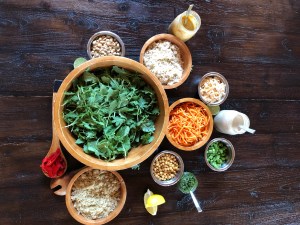
These are the main categories I used to set up my bowl bar. I went with 2-3 items per category. Here are some suggestions to get you started.
Grains (Quinoa, brown rice, bulgur)
Greens (Kale, arugula, fresh herbs)
Crunchy veggies (carrots, tomatoes, snap peas, red cabbage, cucumber)
Soft/roasted veggies (cauliflower, sweet potato, red peppers, edamame, black beans, corn, olives)
Toppings (nuts/seeds, cheese, roasted chick peas, coconut chips)Lunch bowls are a combination of greens, grains, soft veggies, crunchy veggies, dressing or sauce and a crunchy topping.
Okay, I may have overdone it a bit for this particular event, but I’ll also show you how to tone down your bowls to meal prep your lunches for a whole week. The great part about this is that you can use ANYTHING you have in your pantry or fridge.
Bowls to try
Morrocan inspired: kale, quinoa, cauliflower, sweet potato, carrot, maple tahini sauce, roasted chick peas and pumpkin seeds.
Caprese: arugula, bulgur, tomatoes, roasted red peppers, pine nuts, bocconcini, pesto, fresh lemon.
Asian inspired: Brown rice, red cabbage, carrots, edamame, peanut sauce, coconut chips, peanuts.
Bowls to take for lunch: A step-by-step guide
Taking this for lunch can be super simple and you can even have a different bowl each day.
Step one: Wash and dry greens of your choice and divide into 5 large containers. I like to use kale because it will last the whole week without browning or getting soggy.
Shortcut: Use pre-washed greens.
Step two: Cook your grains and let cool. I like quinoa, because nobody else in my household does, so I take advantage and have it for lunch. You’re going to put your grains in a smaller container or jar. You can add your sauces to the grains if you want to have that all prepped ahead of time, or you can just bring the sauce in your lunch bag and add it at lunch time.
Shortcut: Don’t bother cooking grains if you have them planned for dinner this week. Cook extra at dinner and portion them then.
Step three: Make fun sauces. Portion them in small 125 ml mason jars so you can just take one on the way out. You can decide in the morning which sauce you’re feeling that day.
Shortcut: Use sauces or salad dressings you already have in the fridge. Think Sriracha, lemon juice, lime juice, soy sauce.
Step four: Add your veggies. This is where you can mix it up. You can prep these all at once, or you can add to your green container on a daily basis if you want to use dinner leftovers.
Shortcut: Use pre-cut or ready to serve veggies such as shredded carrots or beets, cherry tomatoes or olives.
Step five: When you get to work, mix it up and eat it. Done and done.
Sauces for your bowls
I made a few sauces for our lunch and this one was hands down everyone’s favorite.
To loosen, leave out at room temperature or add a bit of olive oil before serving.
Well, this will have your lunches covered, at least for the first week back at school. For more back to school posts, check out my teacher friend Lauren’s blog for her three part back to school series on her blog Everything in progress.
Round 9 of the Easy Cooking for Busy Families Membership now in progress.
Join now! Dismiss


 Lunch bowls are a combination of greens, grains, soft veggies, crunchy veggies, dressing or sauce and a crunchy topping.