We’re all looking for easy no-cook meals to have on a hot day or to take with us camping or to the beach. A summer salad travels well, doesn’t take up a lot of space in your cooler, and will fill you up for a day of fun in the sun.
Minimal prep required
What I like most about these salads is that they don’t require too much prep. All you have to do is cook some grains or noodles ahead of time. Most of the ingredients in this salad builder don’t require chopping. Use ready-to-serve ingredients, to make these salads quick to assemble and easy to prepare.
Maximize cooler space
Since these summer salads use mostly non-perishable ingredients, you will only need to store the grains or pasta and a few vegetables in your cooler. Assembling these salads once you arrive at your destination prevents you from having to store a full container in your cooler. I like to use silicone food storage bags like these ones from Zero Waste Mvmt, to reduce waste while camping. They also store flat, don’t take up a lot of space in your cooler, and can be washed out and used for another purpose while you’re traveling. Use the discount code TBL10 to get 10% off your order.
Picky eater & allergy-friendly
One of the biggest challenges when camping or weekend meal planning with other families is accommodating everyone’s likes and dietary restrictions. By assembling your salads on-site, you can serve all the components deconstructed or buffet-style and everyone can customize their salad.
Store-bought shortcuts
Using jarred or canned ingredients prevent you from having to use precious cooler space, especially when you will be living out of a cooler for a weekend. Homemade dressings like these ones are easy to whip up before you go and can be stored in mason jars in your cooler. Using store-bought dressings works just as well.
Summer salad ideas
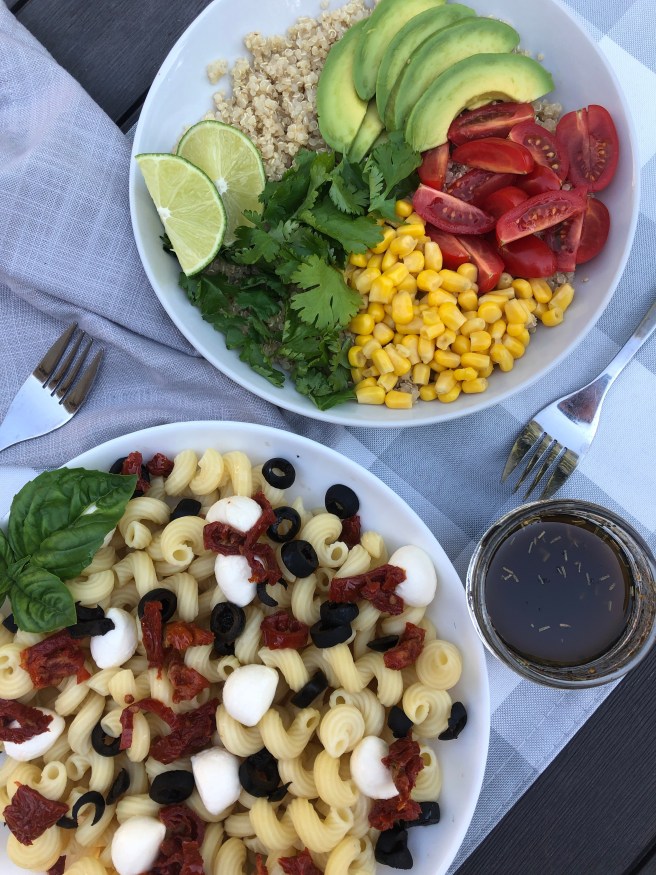
Here are a few combinations you can try for inspiration:
Quinoa, chickpeas, grape tomatoes, black olives, feta, greek dressing
Quinoa, black beans, corn, red pepper, cilantro, chipotle lime dressing
Other summer salads for at home
Salads with lettuce have a shorter shelf-life, especially once you add the dressing. They’re not ideal for camping or the beach, but they are great for a quick no-cook meal if you’re enjoying the heat at home. Try this Strawberry Poppy Seed Salad or this Waldorf Salad with Tarragon Dressing.
When we go camping or out to the lake, our biggest obstacles are usually how to keep the food cold (cooler space and/fridge space) and how to pack enough food in one cooler to last the weekend. These obstacles are easy to overcome if you plan and prep before you go.
As an Amazon Associate I earn from qualifying purchases. Click the links if you want to purchase the products I use. I only promote products I use and love!
Maximize cooler space
I mentioned in How to pack efficiently for your weekend getaways, one of my favorite food packing tips. Freeze everything you possibly can, so it can act as an ice pack and save valuable real estate in your cooler. Another way to maximize cooler space is to bring smaller containers of larger items like condiments. Do you really need a whole bottle of Ketchup for one weekend? Not likely. Using small mason jars or reusable containers will help you save space.
Minimize ingredients
It’s easy to save space when you bring less stuff. My best tip for reducing the number of ingredients to pack, is to try to use them in more than one way. For example, you can use naan for Breakfast Pizza, then use it again for Greek Chicken Wraps for lunch or dinner. When planning your menu, start with one meal, then see what ingredients you can use in the next.
Prep before you pack
There are very few disadvantages to prepping before you pack. You will save on cooler space and you will save on cooking time when you’re camping. A general rule that I follow when packing a cooler is that anything that is frozen stays in the original packaging or in Ziploc bags (double up meat and liquids to avoid a mess in your cooler) and anything that is cut or pre-cooked goes in containers.
How to prep and pack meats
Smoked meats (hot dogs, bacon, farmer sausage, breakfast sausage) should stay in their original packaging and frozen to function as ice packs.
Whole cuts of meat (chicken breasts, steaks, fish, shrimp) should be portioned and sliced if necessary prior to cooking, then frozen in Ziploc bags to act as ice packs.
Ground meats can be frozen in Ziploc bags uncooked, or take it a step further and cook it (for example for tacos, pasta sauce or meatballs) then freeze it once it has been cooked.
Pre-made burger patties should be stored in containers so that they don’t get squished.
How to pack and prep fruits and vegetables
Fruits and vegetables are the number one space hogs of the cooler. I remember going on an Outdoor Ed. hiking trip with some grade 11 and 12 students and one student actually packed a whole watermelon in his backpack! Totally unnecessary.
Large fruits like melons and pineapples have staying power if they’re cut in advance, so storing them in a container is sure to save you space and time.
Berries tend to spoil quicker if washed and cut ahead of time, so keep those in their original containers if you can, and wash and eat as needed.
Whole fruits like apples, oranges, peaches and bananas don’t need to take up valuable space in your cooler, so store them in a large storage bin with your non-perishables. This is a tip you’ve seen before in How to pack efficiently for your weekend getaways.
Using a large storage bin for non-perishables helps keep food from getting crushed. It also allows for easy access throughout the weekend and is convenient for storing in your vehicle to keep the bears away.
How to pack and prep non-perishables
As I just mentioned, it’s a good idea to store non-perishables in a large storage bin, to avoid squishing, crushing, and for easy access throughout the weekend. Also great if you need to store food in your car to keep the bears out. Storing in a bin makes packing a breeze, because when you get home with your groceries for your trip, you can pack them directly in your bin.
Sample meal plan
I’ve included a PDF sample two-day meal plan here, if you want a detailed look at how I plan. It includes ingredients required, pre-pack prep instructions, on-site prep instructions, and additional considerations.
Packing for your weekend getaway doesn’t have to take up all your time.
We don’t travel much. Yet. With four small kids, (ages 18 months, 3, 4, and 6) the idea of “travelling” stresses me out right now. Since we are both teachers, our summer schedule is pretty much wide open and ready for impromptu getaways with the kids. We love heading to family’s and friends’ cottages or heading to a hotel with a great water park that doesn’t require air travel. We are pretty much game for anything. It doesn’t matter where we go, or for how long, it seems like, with six people, we are always bringing so. Much. Stuff.
I’ve developed a system that makes packing a little less daunting and more efficient in the grand scheme of our daily life. Here are 9 tips that I use regularly when I pack.
Tip #1 – Have a swimming bag
This is my favorite tip because whether you’re heading out to the lake for the weekend, or just heading to the splash pad for the day, you are ready even before you’ve made plans. I like to use the big blue bag from Ikea for this, because it’s waterproof, I can toss it in the washing machine if it gets dirty, and I won’t be upset if it gets forgotten somewhere or destroyed. Here is what I pack in ours:
one towel for each person
one swimsuit for each person
sunscreen
swim diapers (I love these cloth swim diapers from AMP. They are 15$ each and do the exact same thing as a disposable swim diaper, except they are better for the planet. I do recommend having two per kid, just in case. If we’re going somewhere for an extended period of time, I will also pack disposable swim diapers because poop happens.)
hats (we operate on two hats per person, so I don’t like to keep hats in the swimming bag because they’re almost always in use anyway, and we always keep one in our outdoor bin, which I mentioned in How to pack a summer deck bin to save time. But, if you have extra hats, by all means, pack them and it will save you from trying to find hats on the way out the door.
Once our bag is packed, I keep it in the laundry room until we need it. You can keep yours wherever you have room for it. Front closet, storage room. It doesn’t matter. What does matter, is what you do with your swimming bag when you get home from swimming. Since the bag is waterproof, wet towels and bathing suits can go right back in the bag for the drive or walk home. The bag then gets dumped directly into the washing machine when we get home.
Tip #1a – Re-pack it once everything has been washed and dried
This saves you time, because everything you need for your next swimming activity is already in your laundry room, ready for your next use. Why put it away, only to pack it up again in the next few days? This wastes time and if you’re like me, you have better things to do with your time than to put away laundry
Tip #2 – Pack a day bag
A day bag is something you can grab when you’re heading to the park, for a walk, or basically anywhere. I like to think of it as a smaller version of a diaper bag. If you’re like me, the more kids you have, the smaller your diaper bag gets. I chose a basic tote from Old Navy that is small enough to fit in the bottom of my stroller. You could use a reusable shopping bag if you’re not picky. Here is what I pack:
diapers
wipes
change pad or receiving blanket
sunscreen
a small non-perishable snack (trail mix, granola bar, dried fruit)
water bottles for the kids
my wallet (so this bag can double as my purse)
change of clothes for the baby
grocery bag for garbage or diaper blowouts, whichever comes first
When you get home from your outing, refill the bag with anything that you used during the day. Since you are doing this right when you get home, you’ll have a pretty good idea of what needs to be restocked.
Tip #3 – Use a laundry bag
Whenever we go anywhere overnight, I always pack a laundry bag. When something is dirty, it goes in the bag. When we get home, we wash the entire bag and we know that everything left in the other bags is still clean. It’s really that simple. I have a laundry bag from Ikea that I love because it’s big, sturdy, and has a drawstring and a mesh pocket for shoes or wet items, but they unfortunately don’t make it anymore!
Tip #4 – One bag per person
Previously, I attempted packing one large suitcase for all the kids to share. This seems like a good idea in theory, because it’s one bag instead of four, however, now that the kids are fairly independent, having their own bag allows them to dress themselves and find what they need without rifling through one shared suitcase.
I love these backpacks from Real Canadian Superstore because they have two mesh pockets for shoes or water bottles and they have a strap on the front to hold a towel or blanket. They also came with a matching lunch box that easily clips onto the front. This is what a three-day getaway looks like for our family of two adults and four kids. Right to left: One backpack for each of the kids, one drawstring bag for adult bedding and pillows, one swimming bag, one bag for each adult, an extra bag for food (there’s only a huge watermelon and a bag of chips in that bag), a storage bin for food and a cooler. All lined up a ready to go in the trunk.
Tip #5 – Assembly line
When I pack, I line the kids backpacks up on a large folding table, where we typically do our laundry. I make piles of clothes in front of each backpack, while folding laundry. There is no need to put laundry away in closets and drawers if you can pack it directly in a bag. I put everything in the backpacks and leave them open until absolutely everything is packed. If I am missing some items before closing up the bags, I write on a sticky note what needs to get put in, then I cross off the items as they get added to the bags.
As an Amazon Associate I earn from qualifying purchases. Click the images below if you want to purchase the products I use. I only promote products I use and love!
I love using these lined Post-It notes for packing. Stick one on the fridge, on the freezer, in front of each person’s bag to ensure you don’t forget anything.
Tip #6 – Pack for trip B while you’re unpacking from trip A
Now that you’ve started your laundry from trip A, think about where your next destination will take you. If it’s coming up within the next week, start packing for trip B. Since you used a laundry bag (see tip #3), you know that everything left in the backpacks is still clean. Take it all out and place it in a laundry basket. Now you’re ready to restart your assembly line for trip B (see tip #5)
Tip #7 – Use a storage bin for non-perishable food
Using a storage bin for non-perishable (and non-refrigerated foods like whole fruits) is beneficial for a few reasons:
Place all your groceries in it ahead of time, saving you precious time the day of your departure.
It stores in the trunk for easy access when you’re camping.
Easily see what’s in it versus a grocery bag
Keep bread, buns and chips from getting crushed and jammed into the trunk.
No instructions needed for this tip. Use a bin. Period.
Tip #8 – Freeze as much as your cooler food as you can
This tip matters less, if your destination has a fridge. If you’re going to keep your food in the cooler all weekend, this is going to save you some space. Freeze items like hot dogs, meats, hummus, homemade pasta sauce and juice boxes so they can act like ice packs. Make sure to consider what your first meal will be on arrival, to ensure that you have something defrosted.
Tip #9 – Make lists
This is my best tip, not only for packing, but for staying organized in general. Make lists! So, to finish off this post, here is a list of all my packing tips, for quick reference. Happy packing!
Pack a swimming bag
Re-pack it once everything has been washed and dried
Pack a day bag
Use a laundry bag
One bag per person
Assembly line
Pack for trip B while you’re unpacking from Trip A
Use a storage bin for non-perishable food
Freeze as much of your cooler food as you can
Round 9 of the Easy Cooking for Busy Families Membership now in progress.
Join now! Dismiss